martes, 1 de diciembre de 2020

Mantenimiento de Articulos con SQLite y Python

Buscar por Nombre con SQLite y Python


Formulario principal

import tkinter as tk
from tkinter import ttk
from tkinter import messagebox as mb
from tkinter import scrolledtext as st
import articulos2

class FormularioArticulos:
    def __init__(self):
        self.articulo1=articulos2.Articulos()
        self.ventana1=tk.Tk()
        self.ventana1.title("Mantenimiento de artículos")
        self.ventana1.geometry("500x500+400+200")
        self.cuaderno1 = ttk.Notebook(self.ventana1)        
        self.carga_articulos()
        self.consulta_por_codigo()
        self.listado_completo()
        self.Buscar()
        self.cuaderno1.grid(column=0row=0padx=10pady=10)
        self.ventana1.mainloop()

    def carga_articulos(self):
        self.pagina1 = ttk.Frame(self.cuaderno1)
        self.cuaderno1.add(self.pagina1, text="Carga de artículos")
        self.labelframe1=ttk.LabelFrame(self.pagina1, text="Artículo")        
        self.labelframe1.grid(column=0row=0padx=5pady=10)
        self.label1=ttk.Label(self.labelframe1, text="Descripción:")
        self.label1.grid(column=0row=0padx=4pady=4)
        self.descripcioncarga=tk.StringVar()
        self.entrydescripcion=ttk.Entry(self.labelframe1, textvariable=self.descripcioncarga)
        self.entrydescripcion.grid(column=1row=0padx=4pady=4)
        self.label2=ttk.Label(self.labelframe1, text="Precio:")        
        self.label2.grid(column=0row=1padx=4pady=4)
        self.preciocarga=tk.StringVar()
        self.entryprecio=ttk.Entry(self.labelframe1, textvariable=self.preciocarga)
        self.entryprecio.grid(column=1row=1padx=4pady=4)
        self.boton1=ttk.Button(self.labelframe1, text="Confirmar"command=self.agregar)
        self.boton1.grid(column=1row=2padx=4pady=4)

    def agregar(self):
        datos=(self.descripcioncarga.get(), self.preciocarga.get())
        self.articulo1.alta(datos)
        mb.showinfo("Información""Los datos fueron cargados")
        self.descripcioncarga.set("")
        self.preciocarga.set("")

    def consulta_por_codigo(self):
        self.pagina2 = ttk.Frame(self.cuaderno1)
        self.cuaderno1.add(self.pagina2, text="Consulta por código")
        self.labelframe2=ttk.LabelFrame(self.pagina2, text="Artículo")
        self.labelframe2.grid(column=0row=0padx=5pady=10)
        self.label1=ttk.Label(self.labelframe2, text="Código:")
        self.label1.grid(column=0row=0padx=4pady=4)
        self.codigo=tk.StringVar()
        self.entrycodigo=ttk.Entry(self.labelframe2, textvariable=self.codigo)
        self.entrycodigo.grid(column=1row=0padx=4pady=4)
        self.label2=ttk.Label(self.labelframe2, text="Descripción:")        
        self.label2.grid(column=0row=1padx=4pady=4)
        self.descripcion=tk.StringVar()
        self.entrydescripcion=ttk.Entry(self.labelframe2, textvariable=self.descripcion, state="readonly")
        self.entrydescripcion.grid(column=1row=1padx=4pady=4)
        self.label3=ttk.Label(self.labelframe2, text="Precio:")        
        self.label3.grid(column=0row=2padx=4pady=4)
        self.precio=tk.StringVar()
        self.entryprecio=ttk.Entry(self.labelframe2, textvariable=self.precio, state="readonly")
        self.entryprecio.grid(column=1row=2padx=4pady=4)
        self.boton1=ttk.Button(self.labelframe2, text="Consultar"command=self.consultar)
        self.boton1.grid(column=1row=3padx=4pady=4)

    def consultar(self):
        datos=(self.codigo.get(), )
        respuesta=self.articulo1.consulta(datos)
        if len(respuesta)>0:
            self.descripcion.set(respuesta[0][0])
            self.precio.set(respuesta[0][1])
        else:
            self.descripcion.set('')
            self.precio.set('')
            mb.showinfo("Información""No existe un artículo con dicho código")

    def Buscar(self):
        self.pagina4 = ttk.Frame(self.cuaderno1)
        self.cuaderno1.add(self.pagina4,text="Buscar por Nombre")
        self.labelFrame4=ttk.LabelFrame(self.pagina4,text="Articulo")
        self.labelFrame4.grid(column=0,row=0,padx=5,pady=10)
        self.label6=ttk.Label(self.labelFrame4, text="Nombre:")
        self.label6.grid(column=0row=0padx=4pady=4)
        self.nombre=tk.StringVar()
        self.entrynombre=ttk.Entry(self.labelFrame4, textvariable=self.nombre)
        self.entrynombre.grid(column=1row=0padx=4pady=4)
        self.boton6=ttk.Button(self.labelFrame4, text="Consultar"command=self.consultar2)
        self.boton6.grid(column=2row=0padx=4pady=4)
        self.listbox1=tk.Listbox(self.labelFrame4,width=35)
        self.listbox1.grid(column=1,row=4,padx=4,pady=4)
        self.boton8=ttk.Button(self.labelFrame4, text="Seleccionar"command=self.sele1)
        self.boton8.grid(column=2,row=4)

    def consultar2(self):
        datos2=self.nombre.get()
        respuesta2=self.articulo1.por_nombre(datos2)
        self.listbox1.delete(0,tk.END)
        for fila in respuesta2:
            self.listbox1.insert(tk.END,str(fila[0])+"  "+fila[1]+"   "+str(fila[2]))

    def sele1(self):
        if len(self.listbox1.curselection())!=0:
            self.listbox1.get(self.listbox1.curselection()[0])
        
    def listado_completo(self):
        self.pagina3 = ttk.Frame(self.cuaderno1)
        self.cuaderno1.add(self.pagina3, text="Listado completo")
        self.labelframe3=ttk.LabelFrame(self.pagina3, text="Artículo")
        self.labelframe3.grid(column=0row=0padx=5pady=10)
        self.boton1=ttk.Button(self.labelframe3, text="Listado completo"command=self.listar)
        self.boton1.grid(column=0row=0padx=4pady=4)
        self.label7=ttk.Label(self.labelframe3, text="Código\tDescripcion\t\t\tPrecio")
        self.label7.grid(column=0row=1padx=1pady=1)
        self.scrolledtext1=st.ScrolledText(self.labelframe3, width=40height=15)
        self.scrolledtext1.grid(column=0,row=2padx=10pady=10)
        # self.scrolltext2=st.ScrolledText(self.labelframe3, width=7, height=10)
        # self.scrolltext2.grid(column=1,row=1,padx=5,pady=5)

    def listar(self):
        respuesta=self.articulo1.recuperar_todos()
        self.scrolledtext1.delete("1.0", tk.END)        
        for fila in respuesta:
            self.scrolledtext1.insert(tk.END, str(fila[0])+"\t"+fila[1]+"\t\t\t"+str(fila[2])+"\n")
            # self.scrolltext2.insert(tk.END, str(fila[2])+"\n")


aplicacion1=FormularioArticulos()

articulos2.py

import sqlite3

class Articulos:

    def abrir(self):
        conexion=sqlite3.connect("bd1.db")
        return conexion


    def alta(selfdatos):
        cone=self.abrir()
        cursor=cone.cursor()
        sql="insert into articulos(descripcion, precio) values (?,?)"
        cursor.execute(sql, datos)
        cone.commit()
        cone.close()

    def consulta(selfdatos):
        try:
            cone=self.abrir()
            cursor=cone.cursor()
            sql="select descripcion, precio from articulos where codigo=?"
            cursor.execute(sql, datos)
            return cursor.fetchall()
        finally:
            cone.close()
            
    def por_nombre(selfdatos2):
        try:
            cone=self.abrir()
            cursor=cone.cursor()
            sql="select * from articulos where descripcion like '"+str(datos2)+"%'"
            cursor.execute(sql)
            return cursor.fetchall()
        finally:
            cone.close()

    def recuperar_todos(self):
        try:
            cone=self.abrir()
            cursor=cone.cursor()
            sql="select codigo, descripcion, precio from articulos"
            cursor.execute(sql)
            return cursor.fetchall()
        finally:
            cone.close()


minuvasoft10@gmail.com
Miguel Nunez

Primero ejecutar el archivo crearTabla.py una vez
import sqlite3

conexion=sqlite3.connect("bd1.db")
try:
    conexion.execute("""create table articulos (
                              codigo integer primary key autoincrement,
                              descripcion text,
                              precio real
                        )""")
    print("se creo la tabla articulos")                        
except sqlite3.OperationalError:
    print("La tabla articulos ya existe")                    
conexion.close()


sábado, 14 de noviembre de 2020

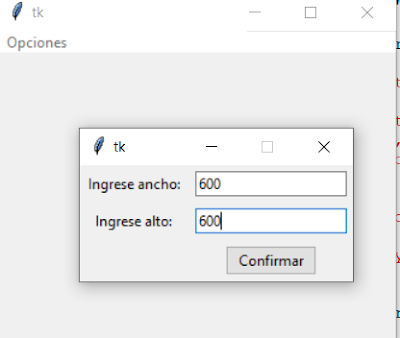
Ventana de Dialogos con Python


import tkinter as tk
from tkinter import ttk

class Aplicacion:

    def __init__(self):
        self.ventana1=tk.Tk()
        self.ventana1.title("Dialogos")
        self.agregar_menu()
        self.ventana1.mainloop()

    def agregar_menu(self):
        self.menubar1 = tk.Menu(self.ventana1)
        self.ventana1.config(menu=self.menubar1)
        self.opciones1 = tk.Menu(self.menubar1, tearoff=0)
        self.opciones1.add_command(label="Configurar ventana"command=self.configurar)
        self.menubar1.add_cascade(label="Opciones"menu=self.opciones1)    

    def configurar(self):
        dialogo1 = DialogoTamano(self.ventana1)
        s=dialogo1.mostrar()
        self.ventana1.geometry(s[0]+"x"+s[1])
        

class DialogoTamano:

    def __init__(selfventanaprincipal):
        self.dialogo=tk.Toplevel(ventanaprincipal)
        self.label1=ttk.Label(self.dialogo, text="Ingrese ancho:")
        self.label1.grid(column=0row=0padx=5pady=5)
        self.dato1=tk.StringVar()
        self.entry1=ttk.Entry(self.dialogo, textvariable=self.dato1)
        self.entry1.grid(column=1row=0padx=5pady=5)
        self.entry1.focus()
        self.label2=ttk.Label(self.dialogo, text="Ingrese alto:")
        self.label2.grid(column=0row=1padx=5pady=5)
        self.dato2=tk.StringVar()
        self.entry2=ttk.Entry(self.dialogo, textvariable=self.dato2)
        self.entry2.grid(column=1row=1padx=5pady=5)
        self.boton1=ttk.Button(self.dialogo, text="Confirmar"command=self.confirmar)
        self.boton1.grid(column=1row=2padx=5pady=5)
        self.dialogo.protocol("WM_DELETE_WINDOW"self.confirmar)
        self.dialogo.resizable(0,0)
        self.dialogo.grab_set()

    def mostrar(self):
        self.dialogo.wait_window()
        return (self.dato1.get(), self.dato2.get())

    def confirmar(self):
        self.dialogo.destroy()


aplicacion1=Aplicacion() 

lunes, 11 de mayo de 2020

Recorrer Registros de Tabla MysQl con Visual C#

Despues de instalar la libreria MySQL para Visual Studio.
Se tiene una data base ventas y una tabla tutorials el cual tiene un campo imagen con el nombre de la imagen que corresponde.
Formulario
C#
using MySql.Data.MySqlClient;
namespace pryGrabar
{
    public partial class Form10 : Form
    {
        MySqlConnection conn = new MySqlConnection();
        DataSet ds = new DataSet();
        DataTable dt = new DataTable();
        int i = 0;
        public Form10()
        {
            InitializeComponent();
            carga();
        }
        private void carga()
        {
            string SQL = "select * from tutorials;";
            string cad = "server=127.0.0.1;uid=minuvasoft;pwd=4321;database=ventas";
            try
            {
                conn.ConnectionString = cad;
                conn.Open();
                MySqlDataAdapter adp = new MySqlDataAdapter(SQL, conn);
                adp.Fill(ds, "tutorials");
                dt = ds.Tables["tutorials"];
               
                btnPri.Enabled = false;
                btnAnt.Enabled = false;
                carga2();
                //MessageBox.Show(dt.Rows[3][4].ToString());
                adp.Dispose();
                conn.Close();
            }
            catch (MySqlException ex)
            {
                MessageBox.Show(ex.Message);
            }
        }
        private void carga2()
        {
            textBox1.Text = dt.Rows[i][0].ToString();
            textBox2.Text = dt.Rows[i][1].ToString();
            textBox3.Text = dt.Rows[i][2].ToString();
            textBox4.Text = dt.Rows[i][3].ToString();
            string cad2 = @"c:\tuto\";
            pictureBox1.ImageLocation = cad2 + dt.Rows[i][4].ToString();
        }
        private void btnPri_Click(object sender, EventArgs e)
        {
            i = 0;
            carga2();
            btnPri.Enabled = false;
            btnAnt.Enabled = false;
            btnSig.Enabled = true;
            btnUlti.Enabled = true;
        }
 private void btnSig_Click(object sender, EventArgs e)
        {
            i = i + 1;
            carga2();
            if (i >= dt.Rows.Count-1) { i = dt.Rows.Count-1; btnSig.Enabled = false; btnUlti.Enabled = false; }
            else
            {
                btnSig.Enabled = true; btnUlti.Enabled = true;
            }
            if (i>=1) { btnPri.Enabled = true; btnAnt.Enabled = true; }
        }
        private void btnAnt_Click(object sender, EventArgs e)
        {
            i = i - 1;
            carga2();
            if (i<=0) { btnPri.Enabled = false; btnAnt.Enabled = false; }
            else { btnPri.Enabled = true; btnAnt.Enabled = true;
                btnUlti.Enabled = true; btnSig.Enabled = true;
            }
           
        }
        private void btnUlti_Click(object sender, EventArgs e)
        {
            i = dt.Rows.Count - 1;
            carga2();
            btnSig.Enabled = false;
            btnUlti.Enabled = false;
            btnAnt.Enabled = true;
            btnPri.Enabled = true;
        }
}
}
minuvasoft10@gmail.com

miércoles, 29 de abril de 2020

Binding Navigator, Binding Source a TextBox MySql con Visual C#

Del cuadro de herramientas agregamos bindingNavigator1, bindingSource1 y 4 textbox.
bindingNavigator1 es una barra con botones de navegacion que se ubica en la parte superior del formulario, como muestra la fig. de abajo.
C#
using MySql.Data.MySqlClient;  // Agregar libreria MySql
namespace pryGrabar
{
    public partial class Form9 : Form
    {
        MySqlConnection conn = new MySqlConnection();
        public Form9()
        {
            InitializeComponent();
            carga();
        }
        private void carga()
        {
            string SQL = "select * from tutorials;";
              
                string cad; string[] A = new string[3];
                cad = "server=127.0.0.1;uid=minuvasoft;pwd=4321;database=ventas";
                try
                {
                    conn.ConnectionString = cad;
                    conn.Open();
                    MySqlDataAdapter adp = new MySqlDataAdapter(SQL,conn);
                    DataSet ds = new DataSet();
                    adp.Fill(ds,"tutorials");
                    adp.Dispose();
                    bindingSource1.DataSource = ds;
                    bindingSource1.DataMember = "tutorials";
                   textBox1.DataBindings.Add("Text",bindingSource1,"tutorial_id");
                   textBox2.DataBindings.Add("Text", bindingSource1, "tutorial_title");
                   textBox3.DataBindings.Add("Text", bindingSource1, "tutorial_author");
                    textBox4.DataBindings.Add("Text",bindingSource1,"precio");
                  conn.Close();
                }
                catch (MySqlException ex)
                {
                    MessageBox.Show(ex.Message);
                }
           
        }
}
}
En propiedades de bindingNavigator1 agregar bindingSource1.
minuvasoft@hotmail.com Miguel Nunez.

miércoles, 22 de abril de 2020

Establecer Fuente Color y Ancho de Columna en DataGridView con Visual C#

Del cuadro de herramientas agregar datagridview.
C#
using System.Windows.Forms;
namespace pryGrabar
{
    public partial class Form7 : Form
    {
        public Form7()
        {
            InitializeComponent();
            carga();
        }
        private void carga()
        {
            dataGridView1.Width = 350;

            dataGridView1.DefaultCellStyle.Font = new Font("Courier",12);
            // Establece el color de Fuente a Azul.
            dataGridView1.DefaultCellStyle.ForeColor = Color.Blue;
            // establece la columna 0 con ancho 200 pixels.
            dataGridView1.Columns[0].Width = 200;

            // Establece la columna 1 con ancho de 75 pixels.
            dataGridView1.Columns[1].Width = 75;

         }
     }
}

Agregar Columna y Fila a Datagridview con Visual C#

De la caja de herramientas se agrega datagridview1.
C#
namespace pryGrabar
{
    public partial class Form7 : Form
    {
        public Form7()
        {
            InitializeComponent();
            carga();
        }
        private void carga()
        {

          dataGridView1.ColumnCount = 2;
          dataGridView1.Columns[0].Name = "Nombre";
          dataGridView1.Columns[1].Name = "Precio";
          string[] fila = new string[2];
          fila[0] = "Leche Laive 1l"; fila[1] = "2.3";
          dataGridView1.Rows.Add(fila);
          fila[0] = "Rice Mahatma 5kg"; fila[1] = "3.4";
          dataGridView1.Rows.Add(fila);

         }
     }
}

miércoles, 15 de abril de 2020

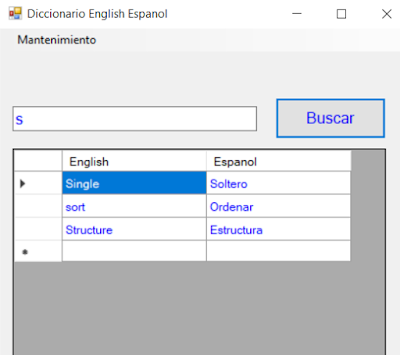
Diccionario English Espanol con Mysql y Visual C#

1.- Descargar e instalar el conector/net para visual studio de www.MySQL.com opcion downloads.
2.- En visual C# 2019, opcion Solution Explorer en el nombre del Proyecto hacer click derecho, despues add y reference, buscar MySQL.data y ok, como muestra la figura.

Diccionario
Creamos una database de nombre Ventas y Tabla dicciona el cual tiene 3 campos idpalabra, eng y espa.
C#
// Agregar libreria MySQL.data
using MySql.Data.MySqlClient;
namespace pryGrabar
{
    public partial class Form5 : Form
    {
        public Form5()
        {
            InitializeComponent();
        }
// Boton Buscar
        private void btnBuscar_Click(object sender, EventArgs e)
        {   // Sentencia SQL
            string SQL = "select * from dicciona  where eng like '"+txtBuscar.Text+"%' order by eng";
            MySql.Data.MySqlClient.MySqlConnection conn;
            string cad; string[] A = new string[2];
            // Cadena de conexion con servidor MySQL.
            cad = "server=127.0.0.1;uid=minuvasoft;pwd=4321;database=ventas";
            try
            {
                conn = new MySql.Data.MySqlClient.MySqlConnection();
                conn.ConnectionString = cad;
                conn.Open();
               
                MySqlCommand cmd = new MySqlCommand(SQL, conn);
                MySqlDataReader data = cmd.ExecuteReader();
                while (data.Read())
                {   A[0] = data[1].ToString();
                    A[1] = data[2].ToString();
                    grid.Rows.Add(A);
                }
                data.Close();
                conn.Close();
            }
            catch (MySqlException ex)
            {
                MessageBox.Show(ex.Message);
            }
        }

        private void palabrasToolStripMenuItem_Click(object sender, EventArgs e)
        {
            Form6 fr = new Form6();
            fr.Show();
        }
    }
}
Formulario form6, mantenimiento de palabras
// libreria mysql
using MySql.Data.MySqlClient;
namespace pryGrabar
{
    public partial class Form6 : Form
    {
        public Form6()
        {
            InitializeComponent();
        }
        private void btnAdd_Click(object sender, EventArgs e)
        {
            MySqlConnection cone;
            string eng1 = txtEng.Text;
            string espa1 = txtEspa.Text;
            // sentencia sql insert
            string SQL = "insert into dicciona(eng,espa) values('" + eng1 + "','" + espa1 + "')";
            string cad;
            // Cadena de conexion a server MySQL.
            cad = "server=127.0.0.1;uid=minuvasoft;pwd=4321;database=ventas";
            try
            {
                cone = new MySqlConnection();
                cone.ConnectionString = cad;
                cone.Open();
                MySqlCommand cmd = new MySqlCommand(SQL, cone);
                cmd.ExecuteNonQuery();
                MessageBox.Show("Los Datos se guardaron con Exito");
                cone.Close();
            }
            catch (MySqlException ex)
            {
                MessageBox.Show("Error " + ex.Message);
            }
            txtEng.Text = null;
            txtEspa.Text = null;
        }
    }
}


lunes, 6 de abril de 2020

Generar Numeros Aleatorios con Visual C#

De la caja de herramientas se agrega un boton y un listBox.
Los numeros aleatorios se generan con la clase Random.
public partial class Form4 : Form
{  // n variable random;
        private Random n = new Random();
        public Form4()
       {  InitializeComponent();
        }
private void btnGenerar_Click(object sender, EventArgs e)
        {
            string na; int i;
            for (i = 0; i < 40; i++)
            {  // 40 numeros entre 1 y 80
                na = Convert.ToString(n.Next(1, 80));
                // na se agrega a la lista
                listBox1.Items.Add(na);
            }
        }
}

sábado, 4 de abril de 2020

Control Trackbar con Visual C#

De la caja de herramientas se agrega trackbar1 y picturebox1.
Conforme el trackbar Avanza aumenta el tamano del circulo.
public partial class Form4 : Form
    {   // Variable global

        private Graphics papel;
        public Form4()
        {  
            InitializeComponent();
            papel = pictureBox1.CreateGraphics();
         }
     // Doble click en trackbar1 se genera el metodo siguiente:
private void trackBar1_Scroll(object sender, EventArgs e)
        {
            SolidBrush pincel = new SolidBrush(Color.Blue);
            label1.Text = Convert.ToString(trackBar1.Value);
            papel.Clear(Color.White);
       papel.FillEllipse(pincel,0,0,trackBar1.Value,trackBar1.Value);
        }

    }

viernes, 3 de abril de 2020

Graficar Triangulo con Visual C#

De la caja de herramientas se agrega picturebox1

 private void triangle(int x,int y,int ancho,int alto)
        {
            Graphics papel;
            papel = pictureBox1.CreateGraphics();
            Pen lapiz = new Pen(Color.Blue);
            papel.DrawLine(lapiz,x,y,x,y+alto);
            papel.DrawLine(lapiz, x, y + alto, x + ancho, y + alto);
            papel.DrawLine(lapiz,x,y,x+ancho,y+alto);
        }
        private void btnTri_Click(object sender, EventArgs e)
        {
            triangle(100, 100, 80, 70);
        }

Graficar Parabola con Visual C#

De la  caja de herramientas se agrega un picturebox1.
En un boton:
private void btnParabola_Click(object sender, EventArgs e)
        { int i,y,x;
            Graphics papel;
            papel = pictureBox1.CreateGraphics();
            SolidBrush pincel = new SolidBrush(Color.Blue);
            for(i=-100;i<100;i++)
            {  //formula de parabola con centro 400,400
                y = -i * i/12+400;
                papel.FillEllipse(pincel, i*2+400, y, 5, 5);
            }
        }
minuvasoft10@gmail.com - Proyectos de Software.

sábado, 28 de marzo de 2020

Imprimir con PrintDocument en C#

Se agrega de la caja de herramientas el control printDocument1 y printPreviewDialog1
Doble click en printDocument1 se genera el metodo PrintPage:
 private void printDocument1_PrintPage(object sender, System.Drawing.Printing.PrintPageEventArgs e)
        { // Se agrega el texto Hola como estas? en la posicion 100,100
            e.Graphics.DrawString("Hola como estas?",new Font("Arial",12),Brushes.Black,100,100,new StringFormat());
  // Se agrega una imagen al documento bike4.png en la posicion 200,200
Image img = Image.FromFile(@"c:\fotos\bike4.png");
            e.Graphics.DrawImage(img, new Point(200, 200));
           
        }
En un boton:
private void button1_Click(object sender, EventArgs e)
        { // Se asigna printDocument1 a printPreviewDialog1
            printPreviewDialog1.Document = printDocument1;
          // Alto y Ancho del dialogo
            printPreviewDialog1.Height = 700;
            printPreviewDialog1.Width = 1000;
            // Se asigna tamano de papel de nombre Ticket de 300x500
            PaperSize pt = new PaperSize("Ticket",300,500);
            printDocument1.DefaultPageSettings.PaperSize = pt;
            // Se muestra el dialogo de impresion mediante ShowDialog()
            printPreviewDialog1.ShowDialog();
        }


Buscar por Codigo de Barras en Excel con Java Netbeans

  import java.io.File; import javax.swing.JOptionPane; import javax.swing.table.DefaultTableModel; import jxl.Sheet; import jxl.Workbook; pu...